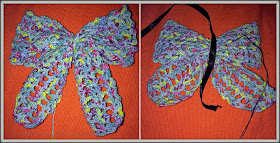
Who will not fall in love with cute ribbons/bows?
Because I am too attached with bows, I'm so happy, I finally made my own. I am also sharing my happiness with you. It is very simple yet a beautiful project.
Materials:
Yarn
Hook
Sewing needle
Tapestry needle
Lace/Ribbon strap
Scissor
Glue
Hair clip
Abbreviation:
CH-Chain Stitch
SC-Single Crochet
DC-Double Crochet
PATTERN:
First Row: CH 16(Don't make it too tight).
Skip 3 chains. In the same chain, make 1 DC. 2 CH and 2 DC.
Skip 3 chains. In the same chain, make 2 DC. 2 CH and 2 DC.
Skip 3 chains. In the same chain, make 2 DC. 2 CH and 2 DC.
Skip 3 chains. In the same chain, make 2 DC. 2 CH and 2 DC.
Second and the rest of the rows: Rotate/turn your finished first row.
Make a slip stitch over the chain space.CH 3. 1 DC. 2 CH. 2 DC. 2 CH (All in same chain space)
Next chain space: 2 DC. 2 CH. 2 DC. 2 CH
Next chain space: 2 DC. 2 CH. 2 DC. 2 CH
Next chain space: 2 DC. 2 CH. 2 DC. 2 CH
I made 60 rows for my project. The length will depend on you. If you want bigger or smaller bow.
But at least 50 row is recommended.
To finish the row:
SC in the edge. CH 3. SC. CH 3. SC. CH 3. SC. CH 3. SC. CH 3. SC in the last DC.
Now we are ready to form the bow.
First: Wrap the both ends using the same yarn. It is shown in the picture below:
Then. Wrap the center to completely form the bow. Use the same yarn. And sew lace strap to finalize the bow.
Last: Glue the hair clip at the back of the bow.
Viola... Bow crochet.
Thank you for reading.
Gem M.


No comments:
Post a Comment